Building the Prototypr Website
The Prototypr website is being rebuilt to prioritise internationalisation, localisation and accessibility. We're starting with a clean slate on a new next.js project, and this section documents each step of the building process.
The website (or front-end) is the part of the app people will visit with a web browser. It's built with NextJS, reading data from a headless CMS backend: Strapi. To begin, we start from a NextJS Starter boilerplate:
NextJS Boilerplate
Rather than reinventing the wheel, we're starting from the NextJS Strapi boilerplate app for a tried and tested project structure from the Next team, with plenty of things ready to go out the box:
- Tailwind CSS
- Progressive rendering set up on pages
/libfolder with GraphQL examples of reading data from Strapi backend
Getting started
Using the command shown in the Next Repository, we can quickly bootstrap the app into a prototypr-frontend folder:
npx create-next-app --example cms-strapi prototypr-frontendOnce cloned, set up the environmental variables, as outlined in the Next repo:
Set up environment variables
Copy the .env.local.example file in the root directory to .env.local (which will be ignored by Git):
cp .env.local.example .env.localThen set each variable on .env.local:STRAPI_PREVIEW_SECRET can be any random string (but avoid spaces), like MY_SECRET - this is used for Preview Mode.NEXT_PUBLIC_STRAPI_API_URL should be set as http://localhost:1337 (no trailing slash).Update Strapi Queries
After running the app, you'll see there's an issue with the graphQL queries as they fail. This is because the format of queries has changed from Strapi v3 to v4. For example:
- the
whereinput is no longer valid - it is replaced with afilteroperator. - the data from Prototypr has a different structure to the dummy strapi project provided by vercel
You can see the queries that come with the Next boilerplate inside lib/api.js. Now we need to update them. To do so, make sure you have some posts data in the backend (see how we set up the backend), and then build the new query in the Strapi GraphQL playground (this comes with the Strapi graphQL plugin) at http://localhost:1337/graphql.
Homepage Query
A good starting point is the home page, which uses the getAllPostsForHome query. This needed to be updated as below. Note how the where input has been replaced and simulated with a filter input:
query Posts($where: PostFiltersInput) { posts(sort: "date:desc", pagination:{limit:10}, filters:$where) { data { attributes { title status slug excerpt date author { data { attributes { displayName firstName lastName avatar } } } } } }}Variables:
{ "where": {"status":{"eq":"publish"}}}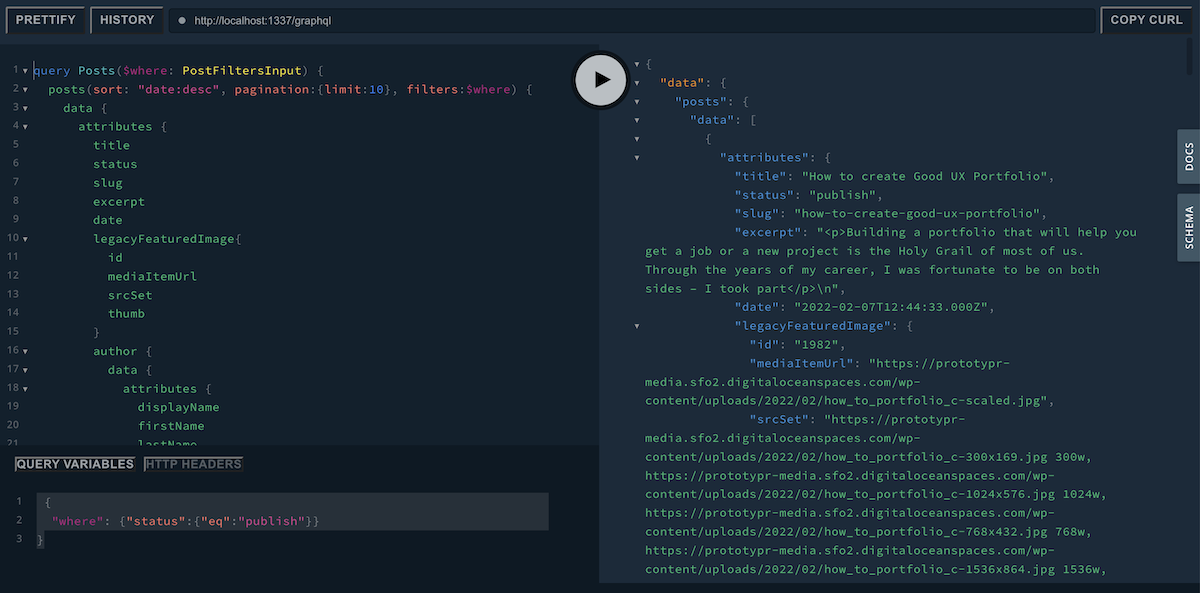
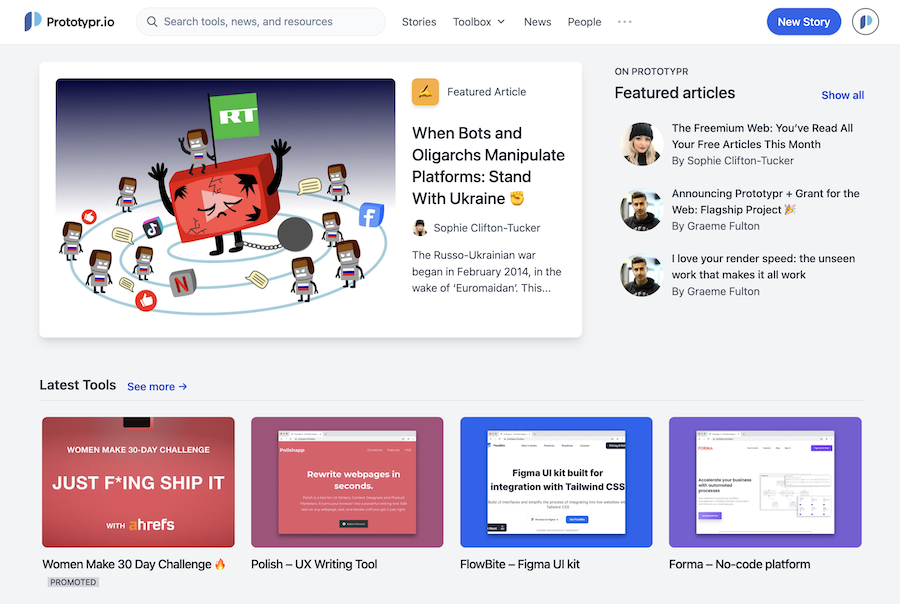
After changing the queries for the homepage, and updating the components (in /components) to use the new data, you get something that looks like this (left is the Next Boilerplate, right is with our data):

Single Page Query
Now the index page shows a selection of posts, clicking one should open the blog post's page inside pages/posts/[slug].js.
If you look inside getStaticProps of the slug page, you'll see the query we need to modify to is getPostAndMorePosts.
getPostAndMorePosts combines 2 queries: posts, and morePosts. There's not much to change, apart from the graphQL query filters, since the where filter is no longer an option. Here's the main change:
- the
postsquery finds the post based on the slug:
posts(filters: {status:{eq:$status}, slug:{eq:$slug}}) {- the
morePostsquery fetches 2 suggested posts for the 'read more' section at the end of the post. It needs to use thenotoperator for the slug, so it fetches 2 suggested posts that are not the current post:
morePosts: posts(sort: "date:desc", pagination:{limit: 2}, filters: {slug:{not:{eq:$slug}},status:{eq:$status}}) {
Archive Pages
Instead of showing everything on one index page, the Prototypr site has different post types: articles, tools, news and inspiration. The sitemap looks like this:

As seen above, there are separate archive pages to show each post type separately.
Our Strapi setup makes this quite straightforward. Since everything is a post, each page will share a similar query, with the main part to modify being the filter.
For example, add a type filter type:{eq:"article"} to get only articles, or type:{eq:"tool"} to fetch only tool posts. The outcome is a separate page for each post type:

- The first image is
http://localhost:3000/posts - The second is for the url
http://localhost:3000/toolbox - The third is an individual tool (e.g.
http://localhost:3000/toolbox/tool-slug)
And here's the tweaks made to the queries to make it happen:
Posts Page Query
File: /lib/queries/postsQuery.js
export default `query Posts{ posts(sort: "date:desc", pagination:{limit:10}, filters:{status:{eq:"publish"}, type:{eq:"article"}}) {...So for the /posts page, the above query is used, and for tools, the following:
Tools Page Query
File: /lib/queries/toolsQuery.js
export default `query Posts($where: PostFiltersInput) { posts(sort: "date:desc", pagination:{limit:10}, filters:{type:{eq:"tool"}}) {Note: To make queries a bit easier to manage in the app, they've been separated out into their own files as shown above.
Pagination
Todo: add how we used next.js dynamic routing to create pagination - and why it's better than infinite scroll
Todo: show how nested dynamic filters work
Internationalisation
Todo: Show libraries used for internationalisation - how it enables localisation
Authentication
For Prototypr, we want to allow users to sign up with Twitter, GitHub, or Google accounts. There are two parts to authentication:
- Front-end: For this NextJS front-end, it's fairly straight forward - but it depends on the backend being set up
- Back-end: This needs to be set up first, and can be a little more confusing - read how to set up the backend with this guide.
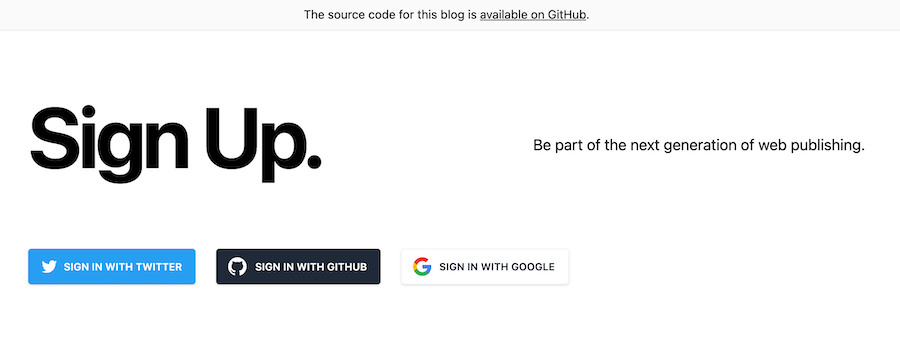
Therefore, we first create a sign up/sign in page in Next: /sign-in, and utilize the NextAuth.js library for authenticating with Strapi.
The first part is straight forward, just create the pages/sign-in.js file, and put in some social sign in buttons. Quick and dirty, using the Next boilerplate:
 Code:
Code:
<div className="pt-6 flex flex-col md:flex-row "> <button onClick={() => signIn('twitter')} style={{ background: 'rgb(29, 161, 242)' }} className="shadow hover:shadow-md text-white font-semibold text-sm py-2 px-4 rounded inline-flex items-center justify-center"> <svg xmlns="http://www.w3.org/2000/svg" width="18" height="18" fill="#fff" viewBox="0 0 24 24" className="mr-2"><path d="M24 4.557c-.883.392-1.832.656-2.828.775 1.017-.609 1.798-1.574 2.165-2.724-.951.564-2.005.974-3.127 1.195-.897-.957-2.178-1.555-3.594-1.555-3.179 0-5.515 2.966-4.797 6.045-4.091-.205-7.719-2.165-10.148-5.144-1.29 2.213-.669 5.108 1.523 6.574-.806-.026-1.566-.247-2.229-.616-.054 2.281 1.581 4.415 3.949 4.89-.693.188-1.452.232-2.224.084.626 1.956 2.444 3.379 4.6 3.419-2.07 1.623-4.678 2.348-7.29 2.04 2.179 1.397 4.768 2.212 7.548 2.212 9.142 0 14.307-7.721 13.995-14.646.962-.695 1.797-1.562 2.457-2.549z" /></svg> <span className="text-xs uppercase">Sign In with Twitter</span> </button> <button onClick={() => signIn('github')} className="shadow mt-3 md:mt-0 md:ml-6 bg-gray-800 hover:shadow-md text-white font-semibold text-sm py-2 pl-3 pr-4 rounded inline-flex items-center justify-center"> <svg xmlns="http://www.w3.org/2000/svg" width="26" height="26" fill="#fff" viewBox="0 0 24 24" className="mr-2"> <path fill="none" d="M0 0h24v24H0z" /> <path d="M12 2C6.477 2 2 6.477 2 12c0 4.419 2.865 8.166 6.839 9.489.5.09.682-.218.682-.484 0-.236-.009-.866-.014-1.699-2.782.602-3.369-1.34-3.369-1.34-.455-1.157-1.11-1.465-1.11-1.465-.909-.62.069-.608.069-.608 1.004.071 1.532 1.03 1.532 1.03.891 1.529 2.341 1.089 2.91.833.091-.647.349-1.086.635-1.337-2.22-.251-4.555-1.111-4.555-4.943 0-1.091.39-1.984 1.03-2.682-.103-.254-.447-1.27.097-2.646 0 0 .84-.269 2.75 1.025A9.548 9.548 0 0112 6.836c.85.004 1.705.114 2.504.336 1.909-1.294 2.748-1.025 2.748-1.025.546 1.376.202 2.394.1 2.646.64.699 1.026 1.591 1.026 2.682 0 3.841-2.337 4.687-4.565 4.935.359.307.679.917.679 1.852 0 1.335-.012 2.415-.012 2.741 0 .269.18.579.688.481A9.997 9.997 0 0022 12c0-5.523-4.477-10-10-10z" /> </svg> <span className="text-xs uppercase">Sign In with GitHub</span> </button> <button onClick={() => signIn('google')} className="shadow mt-3 md:mt-0 md:ml-6 bg-white hover:shadow-md text-gray-800 border border-gray-100 font-semibold text-sm py-2 pl-3 pr-4 rounded inline-flex items-center justify-center"> <svg width="24" height="24" className="mr-2" xmlns="http://www.w3.org/2000/svg" xmlnsXlink="http://www.w3.org/1999/xlink" viewBox="0 0 48 48" > <defs> <path id="prefix__a" d="M44.5 20H24v8.5h11.8C34.7 33.9 30.1 37 24 37c-7.2 0-13-5.8-13-13s5.8-13 13-13c3.1 0 5.9 1.1 8.1 2.9l6.4-6.4C34.6 4.1 29.6 2 24 2 11.8 2 2 11.8 2 24s9.8 22 22 22c11 0 21-8 21-22 0-1.3-.2-2.7-.5-4z" /> </defs> <clipPath id="prefix__b"> <use xlinkHref="#prefix__a" overflow="visible" /> </clipPath> <path clipPath="url(#prefix__b)" fill="#FBBC05" d="M0 37V11l17 13z" /> <path clipPath="url(#prefix__b)" fill="#EA4335" d="M0 11l17 13 7-6.1L48 14V0H0z" /> <path clipPath="url(#prefix__b)" fill="#34A853" d="M0 37l30-23 7.9 1L48 0v48H0z" /> <path clipPath="url(#prefix__b)" fill="#4285F4" d="M48 48L17 24l-4-3 35-10z" /> </svg> <span className="text-xs uppercase">Sign In with Google</span> </button></div>You'll notice each button has an onClick handler that calls a signIn function - this is provided by the NextAuth.js library, and included at the top of our sign-in component:
import {signIn, signOut, useSession} from "next-auth/react"
Let's look at how to set it up:
NextAuth.js
NextAuth is an open source authentication system for Next.js, and includes all the social logins we need. The example code shows how to set it up:
- Add an API route in the Next project (
pages/api/auth/[...nextauth].js) - Configure the session state by wrapping the app in
<SessionProvider> fromnexta-auth/react` - Finally, configure it to work with Strapi - this is covered in this tutorial from the Strapi blog
In addition to these steps, ensure the nexy .env file contains the environmental varibales for the social services you're using. Our .env file looks like this:
.env file
STRAPI_PREVIEW_SECRET=randomlygeneratedsecretNEXT_PUBLIC_STRAPI_API_URL=http://localhost:1337NEXTAUTH_URL=http://localhost:3000NEXTAUTH_SECRET=randomlygeneratedsecretNEXT_PUBLIC_API_URL=http://localhost:1337NEXT_PUBLIC_DATABASE_URL=postgres://graeme:graeme@localhost:5432/prototyprGITHUB_ID=appidGITHUB_SECRET=appsecretTWITTER_ID=appidTWITTER_SECRET=appsecretYou can find the GitHub and Twitter id/secrets when creating a developer app in both of them.
With that set up, steps 1 and 2 can be done by following the example code on the NextAuth site, but step 3 is the Strapi part, where a fetch request is made to create a Strapi user.
Authenticating with Strapi in NextAuth
NextAuth handles social signup mostly for us. The important part we need to do is authenticate with Strapi from the JWT callback function in pages/api/auth/[...nextauth].js.
Inside the JWT callback, we have to send our tokens to the Strapi server. The API endpoint using a fetch request with the appropriate parameters. It's important to get this URL correct, for example api/auth/twitter/callback:
let url = new URL(`${process.env.NEXT_PUBLIC_API_URL}/api/auth/${account.provider}/callback`)const response = await fetch(url.toString());Here's the full callback in Prototypr. Note that a different token is attached to the URL params depending on the social platform:
jwt: async ({ token, user, account, profile, isNewUser }) => { const isSignIn = user ? true : false; if (isSignIn) { let url = new URL(`${process.env.NEXT_PUBLIC_API_URL}/api/auth/${account.provider}/callback`) if(account && account.provider){ //TWITTER if(account.provider=='twitter'){ url.searchParams.set("access_token", account.oauth_token) url.searchParams.set("access_secret", account.oauth_token_secret) }else{ //GITHUB if(account && account.provider){ url.searchParams.set("access_token", account.access_token) url.searchParams.set("access_secret", account.refreshToken) } } } const response = await fetch(url.toString()); const data = await response.json(); token.jwt = data.jwt; token.id = user.id; token.avatar = user.image; } return Promise.resolve(token); },⚠️ Finally, make sure the Callback URL is set up correctly in your developer applications for social providers. Read here for how to set it up correctly.